We all have our hobbies and as it happens my husband collects postcards :) He invited me to go with him to a postcard fair. The exciting bit is that they also have tons of vintage photo's and ephemera. I hope I will find something nice that I can share with you too.
Talking about vintage images, Leaping Frog, a great place to find vintage images, is holding a give-away, go and check it out!

Saturday


Friday
Vintage Image Share 1 - Ladies
"There is no delight in owning anything unshared."
Seneca
I have been collecting vintage images / postcards for a while now and recently started to scan them in to use in my art work. Thought I share them with you, free for you to use in your personal art projects, enjoy!

Click image to save/download

Click image to save/download

Click image to save/download
The Stamp Man challenge - Embellish It!
Embellish It!... is the current challenge at The Stamp Man. I must admit I never like to 'over' embellish my projects... just enough that it enhances my work or in some cases covers up the mistakens I made :) Finding the right items is not always easy but definitely the most fun!
I thought as we just had Chinese New Year I stay in the oriental zone. I used a Hero Arts background stamp to emboss the Chinese (Thank You) text on creme cardstock. I then covered it with red distress stain. I do love this ink... it is so easy to use and colours your projects perfectly.
I found an oriental image on the web and cut it out using the spellbinders die. I layered the card on some black card stock and added a black organza ribbon. And here comes my modest embellishment... on top of the bow I attached a chinese coin.
To compliment the card I created a pocket with red vellum. Red is considered a lucky colour in China, in fact on special occasions - like the Chinese New Year - they give each other red envelopes with money for luck. I don't know about the red... just the money is welcome for my craft funds ha ha.

Materials I used are;
Chinese Coin - The Stamp Man Embellishment Kit
Vellum Pack 12 x 12 - Bright Colours
Tim Holtz Distress Stain - Aged Mahogany
Tim Holtz Distress Ink Pad - Walnut Stain
VersaMark - Watermark Ink Pad
Stampendous Embossing Powder - Clear
Card stock - black, creme
Hero Arts Cling Stamp Chinese Thank You (CG121)
Black organza ribbon
Spellbinders Nestabilities - Postage Stamps (S4-348)
You can find the materials at The Stamp Man
I thought as we just had Chinese New Year I stay in the oriental zone. I used a Hero Arts background stamp to emboss the Chinese (Thank You) text on creme cardstock. I then covered it with red distress stain. I do love this ink... it is so easy to use and colours your projects perfectly.
I found an oriental image on the web and cut it out using the spellbinders die. I layered the card on some black card stock and added a black organza ribbon. And here comes my modest embellishment... on top of the bow I attached a chinese coin.
To compliment the card I created a pocket with red vellum. Red is considered a lucky colour in China, in fact on special occasions - like the Chinese New Year - they give each other red envelopes with money for luck. I don't know about the red... just the money is welcome for my craft funds ha ha.

Materials I used are;
Chinese Coin - The Stamp Man Embellishment Kit
Vellum Pack 12 x 12 - Bright Colours
Tim Holtz Distress Stain - Aged Mahogany
Tim Holtz Distress Ink Pad - Walnut Stain
VersaMark - Watermark Ink Pad
Stampendous Embossing Powder - Clear
Card stock - black, creme
Hero Arts Cling Stamp Chinese Thank You (CG121)
Black organza ribbon
Spellbinders Nestabilities - Postage Stamps (S4-348)
You can find the materials at The Stamp Man
The Stamp Man Challenge - The Colour Red
Vix is hosting the Stamp Man challenge this time and she has chosen the theme 'The Colour Red'. What a great start and a perfect colour to create something for valentine :)
I actually managed to create a card, not something I would usually do. In fact I created 2!

I used paper from the Prima Botanical 6x6 pad to cut out 9 squares and collaged them onto some creme cardstock. Then I used the woodware Daisy Punches to create some flowers and stamped the lips (Non-Sequitus Across The Miles) on the middle square. I used Versamark and embossed it with Lindy's Embossing Powder in my favourite colour. Inside the card I used a frame stamp from Aspect Of Design - Artistic Elements and another stamp from the Non-Sequitus Across The Miles.
As I was on a roll I created a matching calendar for 2012. I found a tutorial for this calender card here. You can make a card like this in any size embellishing it in any way you want. Mine is in valentine style with a little pocket on the back to add notes. You can easily send it so someone because it folds up flat and fits in an envelope :)

Materials I used are;
Prima Paper Stack 6x6 - Botanical
Card stock - Creme, Red and Kraft
Non-Sequitur Plate 43C - Across The Miles
Aspects Of Designs - 62-Artistic Elements
Tim Holtz Sizzix Alterations - On The Edge Die - Scrollwork (656624)
Lindy's Stamp Gang Moonglow Embossing Powder - Terracotta Plum
Self Adhesive Pearls - Red
Woodware Daisy Punch Set
You can find the materials at The Stamp Man
I actually managed to create a card, not something I would usually do. In fact I created 2!

As I was on a roll I created a matching calendar for 2012. I found a tutorial for this calender card here. You can make a card like this in any size embellishing it in any way you want. Mine is in valentine style with a little pocket on the back to add notes. You can easily send it so someone because it folds up flat and fits in an envelope :)

Materials I used are;
Prima Paper Stack 6x6 - Botanical
Card stock - Creme, Red and Kraft
Non-Sequitur Plate 43C - Across The Miles
Aspects Of Designs - 62-Artistic Elements
Tim Holtz Sizzix Alterations - On The Edge Die - Scrollwork (656624)
Lindy's Stamp Gang Moonglow Embossing Powder - Terracotta Plum
Self Adhesive Pearls - Red
Woodware Daisy Punch Set
You can find the materials at The Stamp Man
Monday
Life Book 2012 - Part 1
This is the first part of my Life Book - Celebration your Inner Goddes Powers (or as I see it positive sides). It is not easy to validate your good qualities as most of us are much better connected to our inner critic.

For more information on the Life Book Project: http://willowing.ning.com/

For more information on the Life Book Project: http://willowing.ning.com/
Friday
The Stamp Man Challenge - Create An Ornament
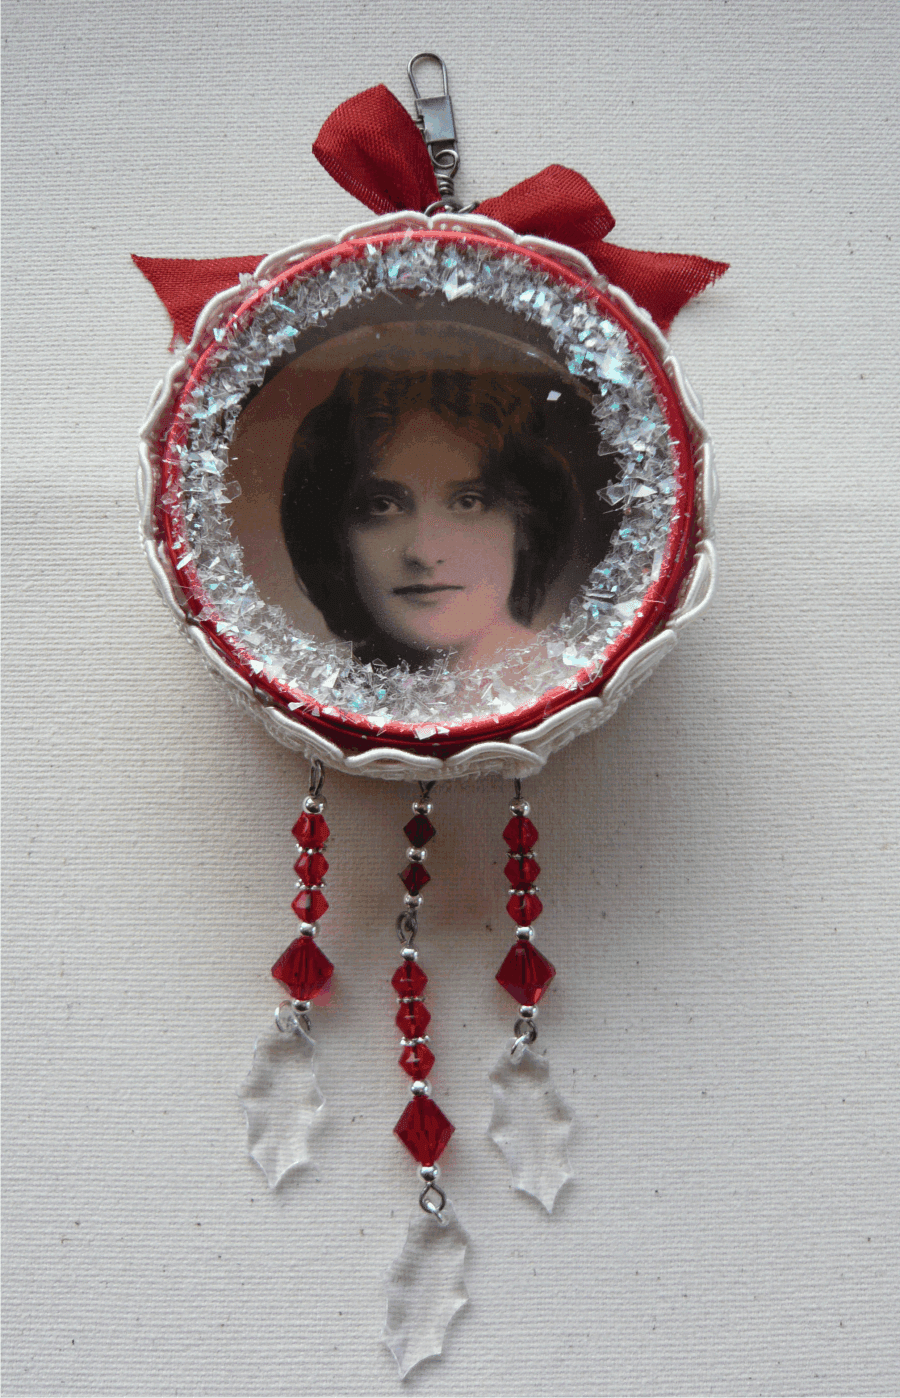
It started all with a small red tin... immidiately when I saw it I thought about making it into an ornament. Well having an idea and actually doing it are two different things.
Anyway I made holes in the tin, one on the top and 3 on the bottom so that I could add some beads and hang the tin. I have been collecting beads and charms for a while... usually recycling old necklaces that I found in a charity shop. These red beads are such a find.
I found a suitable image on the web (from The Graphics Fairy) and cut it with the Spellbinders large circle die. I used the same dies to cut out a piece of double sided tape from an A4 sheet. I stuck this piece on the front of the lid of the tin and added glitter flakes. I glued trim on the edge of the tin after I added the bead charms I created. I finished it of with a red ribbon and a small clasp (don't know how it's called ~smile~).

Materials I used are;
Anyway I made holes in the tin, one on the top and 3 on the bottom so that I could add some beads and hang the tin. I have been collecting beads and charms for a while... usually recycling old necklaces that I found in a charity shop. These red beads are such a find.
I found a suitable image on the web (from The Graphics Fairy) and cut it with the Spellbinders large circle die. I used the same dies to cut out a piece of double sided tape from an A4 sheet. I stuck this piece on the front of the lid of the tin and added glitter flakes. I glued trim on the edge of the tin after I added the bead charms I created. I finished it of with a red ribbon and a small clasp (don't know how it's called ~smile~).
Materials I used are;
- Tin round clear top 6cm - red
- Woodware Double Sided A4 Sheets
- Spellbinders Nestabilities - Circles Large
- Stampendous Frantage - Shaved Ice
- Metal clasp
- Vintage seam binding - Nu Rust
- Trim - creme
- Bead findings - eye pins and spacer beads
- Recycled - beads
Thursday
Ink on the carpet!
We all use the sprays for our projects... glimmer mist, shimmer mist, perfect pearls and the Lindy's mists and sprays as they add such a nice shine to our projects. It is my personal experience that most spray bottles will become clogged up after using it a couple of times. How annoying is that when you are in the middle of a creative outburst! Just recently I used some shimmer mist and ended up with stains on my carpet eventhough I was aiming for my paper in a box, it's a miracle it did not end up in my face.
But help is at hand.. when I started using the Lindys Stamp Gang products I was pleasently surprised how well the spray bottle works... over and over again... without having to run to the tap to unclogg the spray top. There are not many places in the UK where you can find a good collection of Lindys products, in fact I have only found one (The Stamp Man).
Looking for bargains to top up my collection I found a great collection of Starburst Stains for a bargain price on Ebay and in case you wonder what you can do with them I found a great post with tutorial from Vixykins how to use the Starburst Stains... go and have a peek!
But help is at hand.. when I started using the Lindys Stamp Gang products I was pleasently surprised how well the spray bottle works... over and over again... without having to run to the tap to unclogg the spray top. There are not many places in the UK where you can find a good collection of Lindys products, in fact I have only found one (The Stamp Man).
Looking for bargains to top up my collection I found a great collection of Starburst Stains for a bargain price on Ebay and in case you wonder what you can do with them I found a great post with tutorial from Vixykins how to use the Starburst Stains... go and have a peek!
Subscribe to:
Posts (Atom)